This was my first animation so when deciding what to do I took the assignment and broke it down into smaller chunks, The first step for me was to figure out what it is I really wanted to get out of this animation project, after a few days deciding I came to the conclusion I wanted to produce a teaser trailer that had an interesting curve to the story and so it became the idea of making a Yellow Jacket swarm, and so you can see where the title derives from.
Next was to determine what system was capable of performing the tasks needed for me to reach my goal that I had in mind. A couple of systems considered were Poser, Bryce and Blender but after looking into each software I found my self leaning more towards professional commercial software like Autodesks 3ds Max. The reason for this choice was simply because after seeing some work done in the other systems it seemed more that 3ds was capable of giving me that finer quality due to the fact that it is widely used along with Maya by video game developers also for special effects in movies and tv commercials. Some movie references are the Xmen movies, Star Wars, Mission Impossible, Spiderman, Jurassic Park, Harry Potter... and the list goes on and on. So from this dazzling list I knew for sure that my only limitation in 3ds max would be my imagination. The other good part about the software is that it could cover all the bases of what I needed to implement and if something is not available then there are a lot of 3rd party plug-ins already developed.
Before jumping into the software because I knew nothing about it, I needed some documentation and tutorials to help me in the learning process. Some online tutorials were good help in figuring out how to move around in 3ds max along with the tutorials that come with the system itself. So I was set and after a few days of learning the system I started modeling.
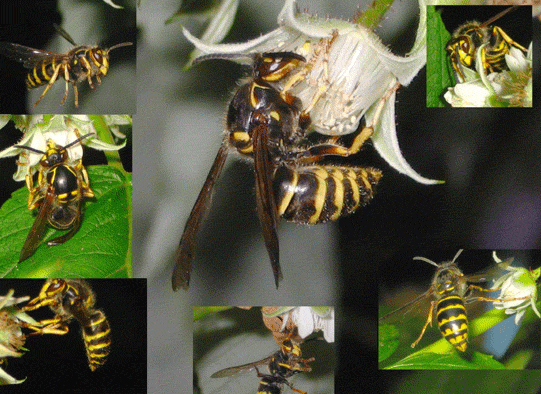
Above Images Taken from Wikipedia
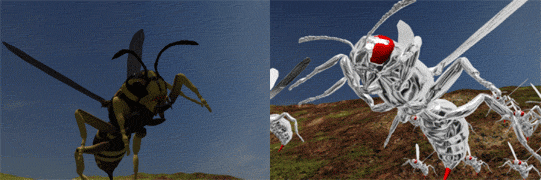
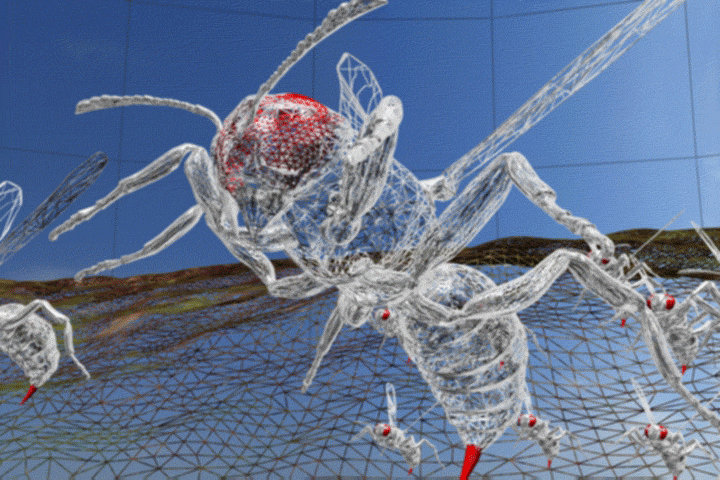
The process of modeling started from the wasp, so with the choice being the Yellow Jacket I found some reference pictures and began to mold it according to the male Yellow Jacket. One of the best modeling techniques I could give advice for is that Nurbs modeling is a very nice touch and seems more refined rather then Box modeling. The hardest task of all seemed to be the creation of the face, to accurately model a face is a very complex and tedious task which involves modeling every curve accurately. If the curves are not reproduced correctly or too sharp, then the final product will not look anything more then a mutated face. I actually modeled the face twice, first time was with box modeling which left me an unsmoothed surface even after applying a mesh smooth modifier on the stack, so I scrapped it and found the nurbs modeling to be very accurate and successfully modeled the whole wasp from head to toe with nurbs. When the wasp was finished it consisted of approximately 130000 faces. One neat trick that I acquired was to find out that when the program calculates the final rendered scene it converts all objects into meshes. So realizing myself that this would be far too many calculations for a swarm of 50 to be on the screen, I converted all the objects into meshes and compressed all the polygons so that each wasp would be no more then 20000 faces. To give it a texture material I carefully skinned the wasp using real samples taken from some high resolution pictures found online by extrapolating little pieces which involved tiresome manipulation in Photoshop so I could UV map it to my models. The cybernetic wasps on the other hand were textured with a reflective metal from the library already included into 3ds max.
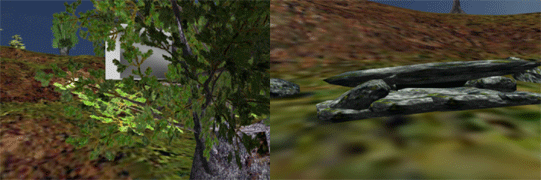
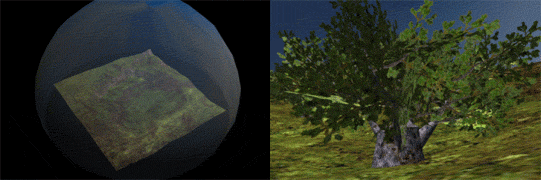
To create the atmosphere an image of a sky was mapped to a half sphere with a general texture of an out door shot of the sky so that I could get a real true blue fade in the atmosphere which is hard to reproduce accurately. A hive for each was also created which you can see in the second take of the animation when the swarm is taking off which were modeled using box modeling and a rock texture was applied that was found online, and the cyborg hive is located in a tree and is a simple cube for a nest that was textured with a generic metallic material. The production of trees and the landscape was left, seeing the time constraints on the project the trees were taken from the BraveTree Tree Collection and the landscape texture was taken from the Dosch Landscapes Library. The whole project was scaled accurately to real life dimensions with in the animation. The landscape plane was approximately 400 feet square and the wasp was modeled to 3 inches in length and the cybernetic wasps were created at 4 inches in length. All trees were then scaled so they would be accurately depicted in a side by side shot.
The type of animation used was a pose to pose animation sequence with auto key enabled. The animation process was just as tedious as face molding because the wasps have a lot of points of movement. So the wasps were rigged using bones and a skin modifier, and to accurately get joints movement I took advantage of the inverse kinematics feature to position and rotate chain links of the bones, and when rigged correctly the joints will move accurately into the corresponding directions giving a real life effect of movement. Also used in the animation was particle effects to create a dust effect when in the opening sequence the wasp falls to the ground in front of the hive, after a little tweaking and color correction it made the wasps fall more realistic and believable. So once the stage was set all was left for the final render which took a total of 8 hours to render the final cut.
So on to the cut scene production phase, to give the effect of a movie trailer it calls for special effect text animation. First I got a shot of the iconic green screen that is at the start of every movie trailer stating that the preview is made for all audiences. Then to make the text effect my choice of software was AfterEffects which was used to make my company title shot located at the start of the trailer and also utilized to create the swooping effects of the text scenes. Similar to 3ds max, AfterEffects utilizes a key frame structure to create the animations and is a very powerful application for final production sequences.
Finally after gathering all the video clips I assembled some audio effects from some royalty free audio sites and also AudioSparx, WB Sound Effects Library, and the background music from the movie Annapolis. Then I modified each track using Audition and spliced each one to suit my needs. Now with this extensive collection of material I now had to assemble it into a trailer that made sense. Using Premiere Pro I assembled all audio and video sequences, applied accurate transitions and produced the credits roll and Voila! mostly everything fit into place where I had anticipated. The overall project took me 14 days to complete from start to finish which most of the time I spent learning about the software and how to use all its features. Out of all the software chosen to be used in this project I would have to agree that 3ds max does have a steep learning curve but I wouldn't do it any other way.
|