The RoomMaker
User Manual
Reverberation System
Steinberg Cubase VST32 5.0
Plug-in
RoomMaker ---- The User Manual
Welcome to the exciting world of digital
reverberation. This documentation is a
guide to the use of the RoomMaker plug-in and its use in the Cubase
VST32 5.0 environment.
Requirements
1.
At
least a Pentium II 400Mhz processor, but Pentium III 500Mhz processor is
recommend.
2.
Windows
95, 98, 2000.
3. Steinberg Cubase VST32 5.0 installed on your computer.
Installation
Note: An installed version Cubase VST32 5.0 is required
to run this plug-in.
To install the Reverb plug-in, follow these steps:
1.
Double-click
on the file called RoomMaker.ZIP.
2.
Extract
the file to folder that the Cubase plug-ins reside. If you installed Cubase with all the default settings, the folder
will be located in C:\Program Files\Steinberg\Cubase VST32\VstPlugins, or if
you have the demo installed C:\Program Files\Steinberg\Cubase VST32
Demo\VstPlugins.
Loading a Wave File into Cubase
1.
Select
File from the menu bar.
2.
Select
Import and Audio File from the options.
3.
Navigate
through the file directory to the folder containing the desired file.
4.
Highlight
the file and select Open.
Playback of A Wave File
The selected file will now appear in the “Arrange”
frame.
To play
the selected file, press the “Play” button on the Cubase playback toolbar.


VST Playback Toolbar
As a default, Cubase plays a metronome beat during
playback of a sample. To turn the metronome off, press the “Click” button so
that it is no longer yellow highlighted.
Accessing the Reverb Effect Plug-in
1.
Select
Panels from the menu bar.
2.
Now
select VST Master Effects from the list.
A new frame will appear in the Cubase workspace entitled “VST Master
Effects”.
3.
Click
on this frame where is says “No Effect”. A list of loaded plug-in effects will
appear.
4.
Choose
the RoomMaker effect from the list.
If the RoomMaker is not on the list of plug-ins, repeat the
section on “Installation” and ensure that the file is being saved to the proper
VSTPlugin file folder.
To apply the Reverb effect, press the red button
beside the name of the effect that you want to apply. When this button is brightly coloured, the effect is being
applied.
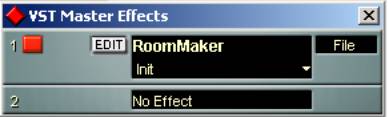
VST Master Effects
To edit the Reverb effects, press the “Edit” button
on the “VST Master Effects” frame. For
reference on editing the parameters of the Reverb effect, see the User Control
section.
Saving Your
Settings
After
you have found a parameter settings that you like and don’t want to forget,
Cubase allows you to save them. This
way you can load up the “bank” at a later time. To save these banks:
1.
Click
the mouse on the “VST Master Effects” frame where it says “File”.
2.
A
list will appear. Scroll down to “Save
Bank”.
3.
A
file dialog box, with a list of your files will appear. Choose a good folder to save the bank, and
enter the file name. Press “Save”. Your parameters are now saved as a file
with the extension .fxb.
To load up a saved bank:
1.
Click
the mouse on the “VST Master Effects” frame where it says “File”.
2.
A
list will appear. Scroll down to “Load
Bank”
3.
A
file dialog box will appear. Find the
folder on your computer where you saved your effects bank.
4.
Select
the file with extension .fxb. Press
“Open”. Your parameters are now loaded into the plug-in.
User Controls
Now for the fun part! The purpose of building this
reverb plug-in was to give the user complete control over a reverberated sound
sample. The following guide to the user
controls is intended to give the user a start to achieving the desired
sound. Hopefully with a little
tinkering, this sound can be achieved, and a few cool sounds will be
discovered.
First,
let’s get familiar with the user interface and the control names.
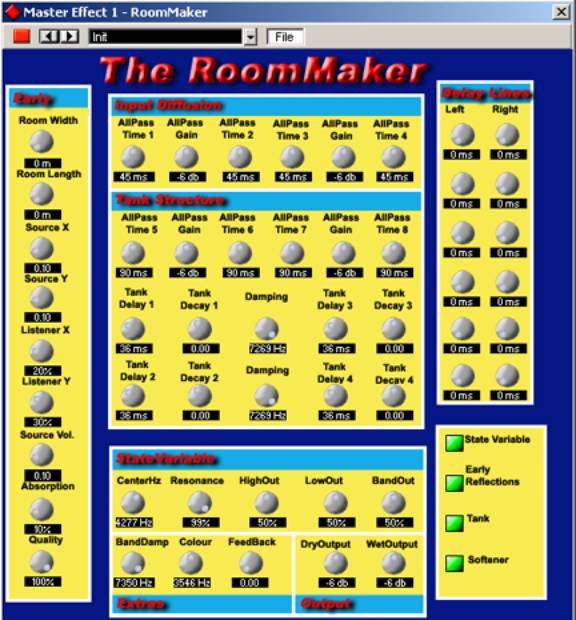
The RoomMaker Interface
Controlling the Volume
The dry output knob refers to the amount of the
original sound sample to include in the output of the reverb effect. Dry output can be thought of as the volume
of the outputted signal without applying any effect. The wet output knob refers to the volume of the reverberated
sound outputted to the playback stream.
Wet and Dry Output are your main parameters to control the volume of the
regular and reverberated signals.
However, other controls have an effect on the volume
of the reverberated sound. You may find
that you may have to adjust the dry and wet outputs accordingly, as you adjust
some of the following settings. Also,
depending on the type of signal, its original volume, the type of frequencies,
etc, these parameters may need to be adjusted.
Any user control with the word “Gain” in it
definitely has to do with the volume of the reverberated sound. A “Gain” is another term for volume. Therefore, increasing the value of a “Gain”
knob will increase the volume of the entire reverberated sound.
The “Gain” Knobs
There are four different “Gain” knobs. Each of these knobs control the gain of the
all-pass filters within Dattorro’s structure.
Setting these values to zero will turn off Dattorro’s structure
completely and output from the RoomMaker.
Increasing them will increase the volume of the system. All-pass filters can also cause the sound of
the reverberator to become somewhat unstable.
The more the All-pass gain is increased, the more metallic the sound
will become. In some instances, the
sound will be similar to that of feedback, or someone standing too close to a
microphone. However, the knobs maximum
gain has been set as to not exceed the point where the feedback is out of
control. There is a knob specially
built for this feedback, which will be discussed later on.
To control the all-pass gains, adjust the knobs
AllPassGain knobs in the Input Diffusion and the Tank Structure sections of the
interface.
Early Reflections
Adjusting the Source Volume knob will also change
volume of the entire system. The Source
Volume is used to calculate the effects that a different volume sound sources
have within a room. When the room sizes
are set to small values, the source volume will probably need to be decreased
as to avoid distorting the output signal.
Knob-by-Knob

Early Reflections
RoomWidth
This knob changes the width size of the room. The maximum width of a room is 60 meters. The minimum size the room is 10 meters.
This knob will be deactivated when the early reflections are turned
off.
RoomLength
This knob changes the width size of the room. The maximum width of a room is 60 meters. The minimum size the room is 10 meters.
This knob will not be active when the early reflections are turned off.
SourceX
This knob moves the source of the sound in the x direction (see Figure
1). Turning the knob to the right will
move the source to the right. Turning
the knob to the left will move the source to the left. The position is in respect to the width of
the room. This knob will not be active
when the early reflections are turned off.
SourceY
This knob moves the source of the sound in the y direction (see Figure
1). Turning the knob to the right will
move the source to the back of the room.
Turning the knob to the left will move the source to the front of
the room.
The position is in respect to the length of the room. This knob will not be active when the early
reflections are turned off.
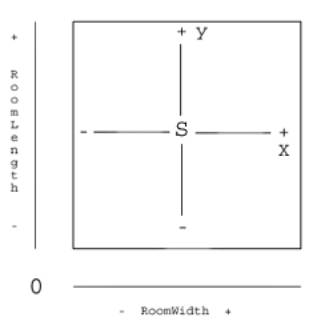
Figure 1: Change the
position of the sound source. + means
turn knob to the right, - means turn knob to the left.
ListenerX
This knob moves the listener to the sound in the x direction (see
Figure 2). Turning the knob to the
right will move the listener to the right.
Turning the knob to the left will move the listener to the left. The
position is in respect to the width of the room. This knob will not be active when the early reflections are
turned off.
ListenerY
This knob moves the listener to the sound in the y direction (see
Figure 2). Turning the knob to the right will move the listener to the back of
the room. Turning the knob to the left
will move the listener to the front of the room.
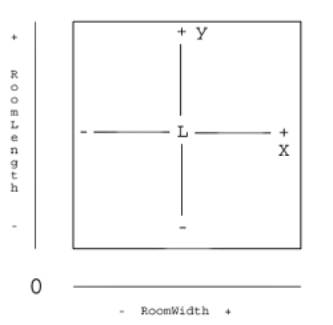
Figure 2: Change
the position of the sound source. +
means turn knob to the right, - means turn knob to the left.
The position is in respect to the length of the room. This knob will not be active when the early
reflections are turned off.
SourceVolume
This knob increases or decreases the volume of the source within the room. Changing this may seem to also change the
size of the room, since we perceive a distant sound as having a fainter volume.
RoomAbsorption
This knob will change the amount of the soft filter decay in a
room. If the RoomAbsorption knob is
turned to zero, the room decay will only be the reverberation generated
Dattorro's tank structure.
Quality
This knob changes the number of buffers used in the soft filter. When quality percentage is low, ie. below
50%, the decay may sound like distinct echoes. A tremolo type effect can be
achieved in the reverb tail if the Quality knob is set to around 10%.
Late Reverberation
Input Diffusion
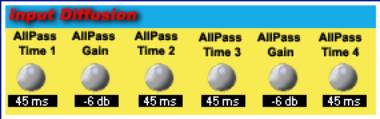
Changing the length of the all-pass filters to have the same values may
make the filter sound like distinct echoes.
When a reverberated sound is desired, set the lengths of the AllPassTime
knobs to different values.
AllPass1
This knob will change the delay length within the first all-pass
filter.
AllPass2
This knob will change the delay length within the second all-pass
filter.
AllPassGain
This knob will change the gain within the first and second all-pass
filters. The more the gain is
increased, the more susceptible to feedback the reverb becomes.
AllPass3
This knob will change the delay length within the third all-pass
filter.
AllPass4
This knob will change the delay length within the fourth all-pass
filter.
AllPassGain
This knob will change the gain within the third and fourth all-pass
filters. The more the gain is increased, the more susceptible to feedback the
reverb becomes.
Tank
Structure
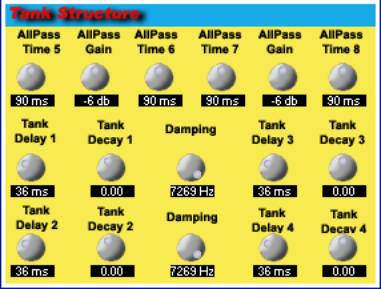
AllPass5
This knob will change the delay length within the fifth all-pass
filter.
AllPass7
This knob will change the delay length within the seventh all-pass
filter.
AllPassGain
This knob will change the gain within the fifth and seventh all-pass
filters.
AllPass6
This knob will change the delay length within the sixth all-pass
filter.
AllPass8
This knob will change the delay length within the eighth all-pass
filter.
AllPassGain
This knob will change the gain within the sixth and eighth all-pass
filters.
Damping1
This knob controls the amount of frequency low-pass cutoff in the first
tank line. When this value is set to
maximum, i.e. no low-pass, the tail may sound like distinct echoes. The sound will also sound more distant with
increased values.
Damping2
This knob controls the amount of frequency low-pass cutoff in the
second tank line. When this value is
set to maximum, ie no low-pass, the tail may sound like distinct echoes. The
sound will also sound more distant with increased values.
State
Variable
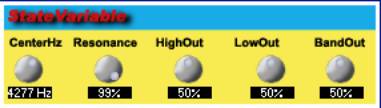
CenterFreq
This knob is the center of the state variable filter. The high-pass output will attenuate any
frequency below this value, and the low-pass output will attenuate any frequency
above this value.
LowOut
This knob controls the volume of the low frequencies in the
signal. The volume of any frequency
lower than the CenterFreq is changed, while the frequencies above the
CenterFreq is attenuated.
HighOut
This knob controls the volume of the high frequencies in the
signal. The volume of any frequency
higher than the CenterFreq is changed, while the frequencies below the
CenterFreq is attenuated.
BandOut
This knob
controls the volume of the high frequencies in the signal. A band-pass is produced by combining a
low-pass filter and high-pass filter.
Given a center frequency, the band-pass will increase the amplitude of
the signal most at this center.
Extras
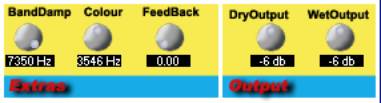
BandWidthDamp
This knob controls the degree of low-pass frequency
cutoff going into Dattorro’s structure.
Feedback
This knob controls the amount of feedback in input
diffusion section of the filter. It is
dependent on the gain values in the diffusion section. If the gains are high, very little feedback
is needed to make the filter become unstable.
But if the gains are low, the feedback must be increased to achieve the
same effect. With the proper amount of
feedback, you can get a sound similar to someone speaking to closely into a
microphone, or a guitar being too close to its amplifier. If the sound becomes so unstable the output
no longer exists, simply decrease the feedback value, and the filter should
correct itself. Have fun!
Output
Dry Output
The dry output knob refers to the amount of the original
sound sample to include in the output of the reverb effect. Dry output can be thought of as the volume
of the outputted signal without applying any effect.
Wet Output
The wet output knob refers to the volume of the
reverberated sound outputted to the playback stream.
Wet and Dry Output are your main parameters to
control the volume of the regular and reverberated signals.
Delay Lines
To
make the resulting output sound in stereo, you can use the delay lines. The delay lines are setup for left and
right output. To send the signal to the
left, adjust one or more of the knobs on the left side of the Delay Lines
area. To send the signal to the right,
adjust one or more of the knobs on the right side of the Delay Lines area. Also, adjusting these knobs can give a sense
of distance to the sound, just like the early reflections.