|
APCO 2P11 Lab 3
|
 |
|
APCO 2P11 Lab 3
|
|
Motherboard Power Connectors [Reproduced from
http://www.pcguide.com/ref/power/sup/partsMotherboard-c.html]
One of the most important connections in the PC is that between the power supply and the motherboard. It is through this connection (or set of connections) that the various voltages and other signals are sent between these two important devices. (You may want to familiarize yourself with these signals in the section on power supply functions if necessary.) Different form factors use different numbers, types, shapes and sizes of connectors between the power supply and motherboard.
Before we look at the connectors, let's talk a bit about the wires that run between the power supply and the connectors themselves. Pretty much all wires within the PC are made from copper, due to its excellent conductivity, relative low expense, and flexibility. The most important characteristic of a wire is its size, and more specifically, its cross-sectional area. The reason is that the resistance of the wire is inversely proportional to the cross-sectional area of the wire. Thicker wires can carry more current, while the higher resistance of small wires causes heating when they are subjected to a high current, which can be hazardous. Since some wires need to carry more power than others, they are given different thicknesses. In addition, most motherboard connectors have multiple wires for the main voltage levels. This allows for more current, spread out between the different wires.
In the electronics world one standard used for wire thicknesses is American Wire Gauge, or AWG for short. The smaller the AWG number, the larger the wire. These numbers go from 0 (below 0 actually) to 50 and above, but for electronics the most common gauges are between 8 and 24. For motherboard connectors the wires are usually AWG 16, 18, 20 or 22. The table below shows these four sizes and some relevant statistics. You'll notice that the numbers are not linear with the actual size of the wire; AWG 16 wire is almost four times the cross-sectional area of AWG 22 wire.
|
AWG |
Diameter |
Cross-sectional |
Approximate Maximum Current (A) |
Relative |
|
16 |
1.29 |
1.31 |
19 |
|
|
18 |
1.02 |
0.82 |
15 |
|
|
20 |
0.81 |
0.52 |
10 |
|
|
22 |
0.644 |
0.33 |
8 |
|
![]() Note:
The relative sizes of the four wires shown above (and below) are
to scale--meaning that their relative sizes are accurate, but all
four are of course enlarged. Also, the current capacities above
are approximate maximums and probably not what would be
considered safe or reasonable to use in a responsible
design.
Note:
The relative sizes of the four wires shown above (and below) are
to scale--meaning that their relative sizes are accurate, but all
four are of course enlarged. Also, the current capacities above
are approximate maximums and probably not what would be
considered safe or reasonable to use in a responsible
design.
The other issue of interest to us regarding wires is the color of their insulation. There are standards established for the colors of various wires, to help avoid confusion by those who work with different components and PCs. While not all manufacturers follow these conventions, most do. If they do not, problems can easily occur when a technician sees a black wire, assumes it is a ground (which it usually would be) and then finds out the hard way that it is not.
Below are diagrams that show the configuration of pins for the various connectors used by different form factors between the power supply and motherboard. In each diagram the pins on the power supply connector are shown in their correct orientation. The color of each pin is the color of the wire established as a standard for that pin. Outside the rectangular outline of each connector, next to each pin, is a depiction of the recommended AWG size for the wire going to that pin, and the name of its signal or voltage. Note that the diagrams are not to scale. Note also that they are shown from the perspective of the connector coming from the power supply. For those connectors with two columns of pins, the mating motherboard connector will have its pins in a mirror-image configuration.
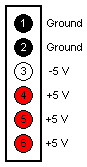
Alright, enough with the preamble. Let's look at the connectors, starting with the oldest style. The PC/XT, AT, Baby AT and LPX form factors all use the same pair of 6-wire connectors, usually called "AT Style" connectors. They are typically labeled either "P8" and "P9" (what IBM originally labeled them) or "P1" and "P2". (Actually, the PC/XT form factor omits the +5 V signal on pin #2 of P8, but otherwise is the same.)
|
|
|
The two "AT style" power connectors,
P8 (left) and P9. |
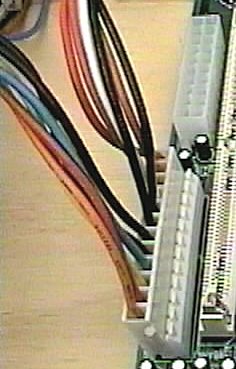
The biggest problem with the design IBM used for these power connectors is simply the fact that there are two of them and they are the same size and shape. The connectors are physically keyed so they cannot be inserted backwards, but it is very possible to accidentally swap them. If you do this, you will be putting ground wires where the motherboard expects live power and vice-versa, and the results would be catastrophic. Thus, technicians working with older systems developed the well-known mantra: "black wires together in the middle"! :^)
|
|
|
Proper installation of the two
AT-style power connectors to a |
|
Original image © Kamco
Services |
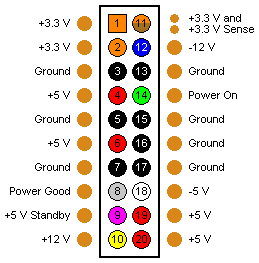
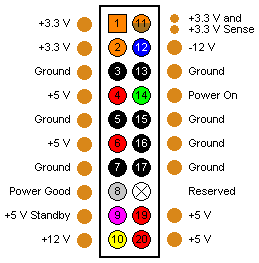
Starting with the ATX/NLX power supply, Intel did away with the potential P8/P9 risk by making the main connection a single piece, and using only dissimilar shapes on any other connections between the power supply and motherboard. These are called "ATX Style" connectors. For its regular power supply connection, ATX uses a 20-pin connector with a square hole for pin #1 and round holes for the other 19 pins.
|
|
|
The main ATX/NLX power connector. The
wires are AWG 18, |
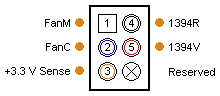
In addition, the ATX specification (version 2.03 is the latest) defines an auxiliary 6-wire connector (in a 1x6 configuration) and an optional 6-wire connector (in a 2x3 configuration). The auxiliary is intended for motherboards that require a lot of power to run their components (250 W or more); it consists simply of more, thicker (AWG 16) wires for the +3.3 V and +5 V signals. The optional connector carries additional signals, as described here.
|
|
|
The ATX auxiliary (left) and optional
connectors. The auxiliary |
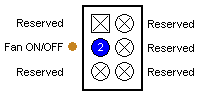
The SFX power supply uses a main connector very similar to that of the ATX. The only difference is that pin #18 is omitted, since the SFX specification does not call for a -5 V signal. The SFX optional connector is similar to the ATX one but stripped down; only the Fan ON/OFF signal is provided, on pin #2. There is no auxiliary connector for the SFX supply, which is not intended for use in systems requiring a lot of power.
|
|
|
SFX main and optional connectors. The
main connector |
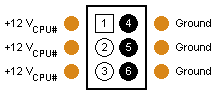
Finally, the WTX form factor. Since WTX is a design intended for workstations and other high end systems, it has a large number of connections to carry the tremendous amount of current that WTX supplies are capable of providing. WTX power supplies therefore have a completely different motherboard interface. The two primary connectors are the 24-pin "main" connector ("P1") and 22-pin "additional" connector ("P2"). Despite P2's name, it is really required by the design, since all the control signals are on it.
|
|
|
WTX main (left) and additional
connectors, P1 and P2. The main connector's |
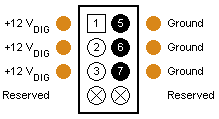
But wait, 40 lines isn't enough; we're not done with WTX yet. :^) In addition to the above, three more connectors are defined. P3 is an eight-pin optional connector (with six pins used) that provides +12 V power to optional power modules or DC-to-DC converters used for additional processors and/or memory within the system. P4 and P5 are six-pin optional connectors used in a similar fashion, to provide additional current for multiple-CPU motherboards or other applications. (Some +12 V power is also provided on P2.) The spec seems to be intentionally flexible (read: vague) regarding how these connectors are to be used.
|
|
|
WTX optional connectors; P3 (left) and
P4/P5. |