Click here to view the movie (Quicktime 9.4MB)
The movie starts with a view of our hero, Disembodied
Arm Man. He has chased his arch enemy, Evil Guy back to his home
on the prairie lands. Disembodied Arm Man draws a bow and flaming
arrow in an attempt to destroy Evil Guy, who is in disguise as a tetherball
(Evil Guy likes to take the shape of small, spherical objects). The
arrow strikes Evil Guy, setting him on fire and sending him bouncing and
spinning out of control. Our hero has destroyed his arch-enemy.
Or has he. . .
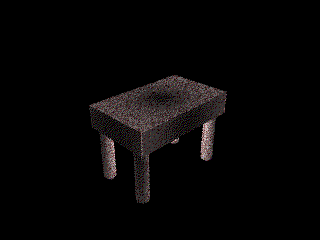
Next we take a short jaunt through Disembodied Arm Man's magical Space House. We take a quick look at his stone table (for no particular reason), then head upstairs. As flames flicker outside the window, we notice a picture on the wall. It's a picture of Evil Guy. Perhaps he is not dead after all.
The view transfers to outside where the deadly and ironic
Hippie Cannon is slowly approaching the Space House. The cannon fires,
and the cannonball (which is Evil Guy in disguise) goes sailing toward
the house. A ridiculously massive and silly explosion occurs and
Disembodied Arm Man's house is destroyed. But fortunately, Evil Guy
dies in the explosion as well.
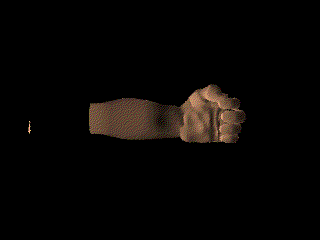
Disembodied Arm Man is the protagonist of this movie. He is what his name suggests, a disembodied arm. This was by far the most difficult model that I made. One finger was made by taking a NURBS sphere, slicing off about a quarter of it, and elongating it so that it had the proper proportions for a finger. Then I narrowed it in where the joints should be. I took all the CV points above each joint in one group, and translated-rotated them so that the finger curled properly. As this was a very difficult task, I only did it once. The remaining three fingers are just scaled replicas of the first one. The thumb was made in a similar way, but it only had one joint.
The palm was modeled using another NURBS sphere with a quarter of it chopped off. The palm was shaped by moving and scaling the sphere's CV points until the shape resembled the palm of my own left hand. The fingers and thumb were then connected to the palm to form the hand.
The arm was relatively simple after the hand was complete. I merely took a NURBS cylinder and smoothed out the edges to make something that looked like an arm. This was then attached to the hand and Disembodied Arm Man was born.
The Bow
Disembodied Arm Man's bow was a simple model to make, but it is in my opinion, my best looking model. The bow was created in two halves that mirrored each other. The first half of the bow is made from a NURBS cylinder. I deformed it into a narrow cone shape by taking the CVs at each span as a group and scaling them inwards so that each group formed a smaller concentric circle as they moved from the base of the cylinder upwards. Then I merely moved each CV group horizontally to get the curved appearance of the bow. After this was done, I duplicated a mirror image of the top half, then grouped the two together to form the bow. The bowstring is simply a very thin NURBS cylinder.
The Cannon
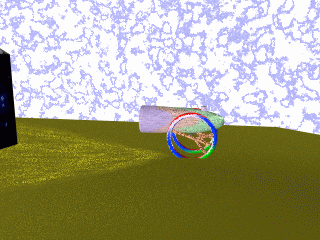
The Hippie Cannon was originally supposed to be a tank, but a cannon was easier to model, and it seemed somewhat more humorous anyway. The barrel of the cannon is a NURBS half-sphere. The sphere was stretched horizontally, after which I tapered the open end slightly. The outer rims of the wheels are simple NURBS toruses, and the spokes are NURBS cylinders. The spokes of the wheels form a peace sign, which goes along with the whole hippie motif of the cannon.
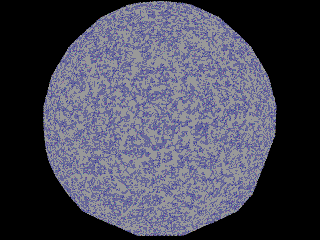
The Tetherball
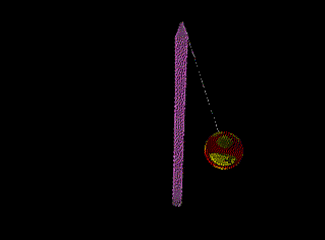
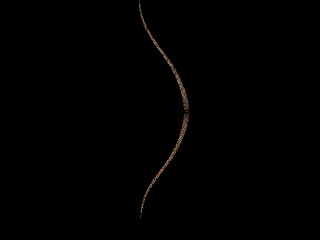
The tetherball is simply a NURBS sphere. The tether pole is a NURBS cylinder with the top deformed into a bulbous point. The tetherball is attached to the pole with a rope, which is a very thin NURBS cylinder.
The House
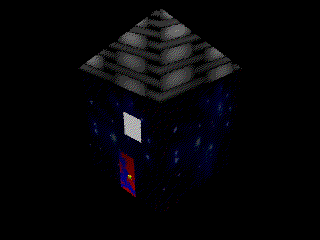
While most of my models are created from NURBS primitives, the magical Space House is modeled almost entirely from polygons. The body of the house itself is a large polygon cube. Polygons were removed from the surface of the cube to make room for the two windows and the door. The roof is a polygon cone with four sections. The ceiling / floor dividing the two levels of the house is a simple polygon plane. A large polygon was removed to allow the stairs to connect the two levels of the house. The stairs consist of ten polygon cubes, each incrementally larger in the y-direction than the previous one.
The picture on the wall on the second floor is just a very thin polygon cube.
The stone table on the first floor is made from a NURBS cube for the tabletop, and four NURBS cylinders for the legs.
The Background
The background is a large NURBS sphere that encompasses
all the other models in my scene. It is textured with a blue and
white procedural stucco texture to give it the appearance of a sky with
clouds.

Evil Guy, the ultimate force of Evil in my little world,
is simply a bit-mapped texture of a face that gets pasted onto various
objects in my scene. I drew the face in MS Paint. Evil Guy
is used to texture the tetherball, the cannonball, and the painting in
the Space House.
In order to make Evil Guy's face clearly visible on the
painting, I had to change the texture node's filter from a mipmap to a
box filter.
Hippie Texture Number 1 - This texture is of my own design
This colourful pastel-like bitmap is used to texture the barrel of the Hippie Cannon. It is applied with a stucco bump map to give the canon its rough texture. I designed this texture using water brushes in Corel Painter.
Hippie Texture Number 2 - This texture is of my own design
This bright splash of colours is used to texture the wheel rims of the Hippie Cannon. I designed it using a kind of exploding paint bomb tool in Corel Painter.
Space House Texture
This bitmapped texture is used for the walls of the magical Space House. It was downloaded from the following free texture web site: http://www.grsites.com/textures.
Procedural Textures
Apart from the four bitmapped textures described above,
several of Maya's built-in procedural textures were used in my scene.
The wood texture was used to texture the bow, the wheel spokes for the
cannon, and the floor of the second floor of the house. A stucco
texture was used for the arrow's tail feathers, and the door of the house.
A cloth texture was used for the roof of the house. The leather texture
was used as a bump map for the tether pole.
The Bow
The bow was my greatest feat of animation in the movie.
Since the bow, bowstring, and arrow were animated individually, special
care had to be taken to ensure that all three objects moved together properly.
The bow was animated by using a bend deformer set to bend the bow backwards
around its middle. The bend factor of the deformer was keyed so that
bow would bend back slightly, then bend forward at the same rate.
The bowstring was more difficult. It also used a bend deformer, so that the bowstring would bend in a V-shape right around its middle when the bow was drawn. What was difficult was keeping the ends of the bowstring attached to the end of the bow. This took careful keying of the bowstrings center CV nodes only, so that they would move to the right position at the right time.
Once the bowstring was animated, animating the arrow was easy. The backward movement of the arrow simply had to be keyed so that the end of the arrow would move simultaneously with the bowstring.
The Tetherball
The rotation of the tetherball around the tether pole
was not a difficult task. A keyframe was set at the point where the arrow
intersected the ball. Four more keyframes for the ball were set,
placing the ball at each of the four cardinal points relative to the tether
pole. While this did not create a true circular rotation around the
pole, the movement happens so quickly that that flaw is not noticed.
The rope attaching the ball to the pole was animated in the same way. Additionally, it had to be rotated at each key frame so that it would properly connect the pole to the ball.
Finally, a squash deformer was placed on the ball, and it was animated to continually expand and retract the ball as it traveled around the pole to give the impression that the arrow caused the ball to bounce.
The Cannon
The animation of the cannon could not have been simpler.
It consisted merely of keyframing the cannon at its start and end positions.
The rotation of the wheels was animated separately. It merely required
setting keyframes every ten frames while the cannon was moving, to rotate
the wheels an additional 360 degrees.
Lightning
Although the sky is clear, two rather long and powerful
flashes of lightning can be seen striking the earth during the movie.
These are constructed with Maya's built-in lightning effect. For
each lightning bolt, I created two tiny NURBS spheres, one positioned at
the ground, and the other in the air above the view of the camera.
It was then a simple matter to create lightning between the two objects.
However, the lightning bolt, by default, lasts for the length of the scene.
Consequently the visibility property of each lightning bolt had to be keyed
so that the lightning would only appear for short periods of time.
The Explosion
The final moment of the movie is when the Hippie Cannon
blows up the Space House. This is done by making the entire house
a giant volume emitter, emitting twenty-five thousand particles per second.
These particles are rendered as particle clouds with a semi-transparent
fire-coloured texture. I implemented the explosion by loosely following
a procedure I read from a book. It originally produced abysmal results
when rendered. I adjusted many of the explosion's properties, such
as making the particles more opaque, and vastly increasing the number of
particles. The result was better, but it was still a highly unrealistic
looking explosion. I believe it would take many hours and a lot of
fine tuning to make a truly realistic explosion.
The rendered images were converted into a Quicktime movie
using Mediaconvert. I then used Movie Maker to add a title screen
and an ending screen to the movie, and compress the file. Compression
was highly effective as it brought a 65 megabyte movie down to 9.4 megabytes.
All in all, this project was an excellent experience. It enabled me to become familiar with computer animation and express my creativity in ways not usually available. Back to 3P98 2001 Animation Gallery.