COSC 3P98 Animation Project
By: Tony Abou-Assaleh
© 2000.01.17
By: Tony Abou-Assaleh
© 2000.01.17
INTRODUCTION
The purpose of this animation project was to have some basic understanding of the animation making process. Although the project didn't directly apply the knowledge achieved in the classroom, it made it possible to see the theory in action and manipulate it to produce an attractive animation.HISTORYThis document will discuss the mental and physical activities that were performed in order to form the final product.
The original idea was to model and animate a modified version of a scene from the movie "The Matrix". Due to the complexity of the original idea and the lack of the experience with the animation software I decided to work on something simpler.THE STORYThe traditional methodology for developing any animation suggests that first there should be a story, then one decides on a subset of the story which he would like to animate, lays down the main actions, and finally comes the actual modeling and animating stage. My project was developed the other way around. First, I decided to model something, which turned out to be a robot. Because a robot needs to exist somewhere, I built a room. The room was empty, so I added a computer and a printer to make it look more like a room.
The next step in my animation process was to make the robot move. As a result, I introduced the motion one can see in the final animation. When all was done, something was missing. Any good animation needs a good story. Being creative is not a very difficult task, so here is the story:
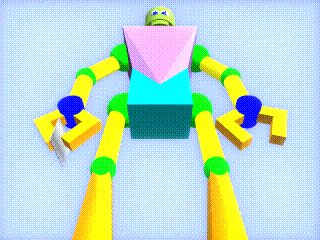
The public fear in the twenty-first century that intelligent robots could control Earth and humans has resulted in restricting any research related to Artificial Intelligence and robotics. Of course, science cannot be stopped. One of the underground researches led to inventing an intelligent cute robot. The main mission of the experiment was to prove to the general public how useful intelligent robots can be and that they are no threat to humans. No one know who created the robot, not even the robot himself.MODELINGRobot's curiosity motivated him to hack into his creators secret office and use the computer to find out who this great man was.
All the modeling was done using Alias|Wavefront Maya 2.0. This part consumed most of the development time and was by far the most difficult part.
ROBOTTEXTURESDATA LINK PLUG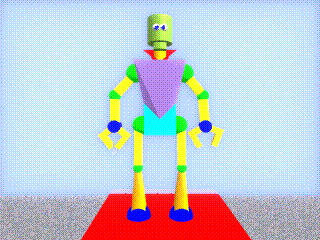
The robot was modeled mostly from primitive NURBS and polygons. "Append to polygon" tool was used to create the upper part of the body and the mouth. I found that it is much easier to create a model once you had a rough sketch on paper. Selecting the appropriate size for the arms and legs was one of the most difficult decisions in modeling the robot. I tried to make the robot as simple as possible because to reduce the animation and rendering time afterwards. This was one of the reasons why the robot did not have 5 fingers.
MONITOR
The data link plug was used as a communication medium between the robot and the computer. This saved me the time that would otherwise be needed to model a keyboard. Another possible solution would have been to use a voice communication. However, I was not sure at that time whether I would have sound in the animation at all.
The data link plug was created from a primitive polygon cone. Scaling three of the base's control vertices towards the centre and then extruding the base's face gave the the plug its current shape.
COMPUTER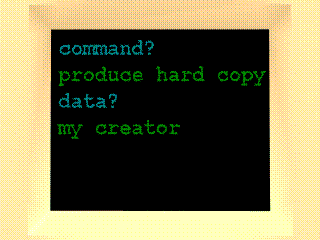
The monitor was modeled from a primitive polygon cube. I tried to make it similar to the monitor in the CSC Office. A plane was used to cover the screen and hold the screen images because moving the control vertices made the screen's surface skewed near the corners.
PRINTER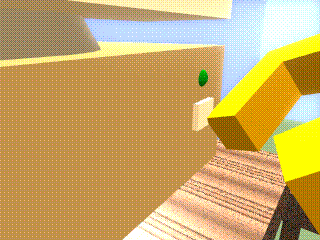
The computer was also modeled from a primitive polygon cube. A combination of a cylinder and a cone where used to create the data link port. The power light was made of a polygon sphere and the power button of a cube.
COMPUTER AND PRINTER TABLES
Although the printer looks very simple, it did require quite some time to model. Choosing an appropriate model for the printer was not an easy task. My goal in designing the printer was to make it look as realistic as possible, while at the same time avoiding any paper deformation.
Modeling the tables was one of the easiest tasks. A few stretched polygons with a wood texture were enough to give the tables a natural look.CHAIRThe tricky part in modeling the chair was to add planar surfaces to the sphere cut. The edge of the surfaces was not as round as the edge of the sphere, which made the chair look like as if it has had wholes in it. Fortunately the solution was quite simple. Rebuilding the surface with more splines in the U and V directions did the trick.
A combination of Maya predefined textures and some original textures were used in the animation.ANIMATINGMAYA TEXTURES
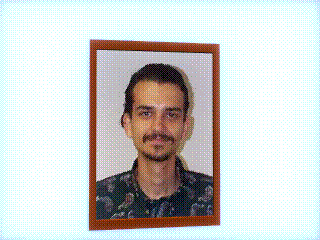
A wood texture was used for the tables. A modified Marble texture was used for the floor in front of the room. The eyes were colored with a ramp texture with white and blue colours. And the chair seat was covered with a leather texture.ORIGINAL TEXTURESThe computer screen had 45 textures to simulate typing letters. These textures were created in MS Paint. The picture of the creator was created using a digital camera. The credits at the end of animation where created using word art in MS Word.
Numerous animation techniques were employed to achieve a variety of movements. The first one was driven key animation. This technique was used to control the door and the robot's hands. Point and aim constrains where used animate the cameras and push the power button. Every thing else was animating using key frame technique with different types of tangents.RENDERINGROBOT
It is obvious from the final animation clip that the robot did most of the movements. Joints and IK-handles where used to move the arms and legs. Robot's body parts were parented to the joints rather than bound to preserve their geometrical shapes. Arm movements were difficult to control because the position of the elbow depended on the initial position and was not controllable afterwards. This made the elbow position look unrealistic in some scenes. To overcome this, I selected the camera angles in a way that reduces this limitation.DATA LINK PLUGControl vertices animation was used to extend the data link plug.COMPUTER SCREENTo animate the computer screen, a sequence of textures was used. The texture frame index was then key framed to give the impression of typing text.CAMERASAlthough camera animation is considered to be one of the most critical components, it was the easiest in my case. While animating the objects I kept thinking about the best angle to display. Afterwards, when I did the camera animation, I knew exactly what I wanted to do.
Seven hundred and fifty frames were used to create the animation clip. Rendering time was about 9 seconds per frame on average.ADDING SOUNDAfter all the frames were rendered Media Convert was used to create a single MPEG file.
Media Convert was also used to create single images in GIF and TIFF format.
The sound clip used in the animation was taken from "Around the World" by Daft Punk. Mixing the sound clip with the animation clip was done using Movie Maker.LIST OF TOOL
Initially, I was supposed to do the animation project with a partner. However, a few days before Christmas my partner notified me that she had to leave the country for the holidays. Consequently, I ended up doing the animation by myself, which doubled my workload.CONCLUSIONThe lack of experience with the animation software and methodology resulted in spending long hours just to learn the basics of Maya.
After finishing Robo-Hack, I was not totally satisfies with my final result. Later on, when my fellow students liked my production, I realized that Robo-Hack was not trivial and that it was worth the effort I spent to create it.This project gave me a new kind of experience. It helped me realize how difficult it is to create short stories using animation software. It also showed me how powerful and flexible the animation software was. Spending many days and nights in the computer lab was not new to me. However, I did not expect that I would have to do that even during the holidays.
I consider that the most valuable thing I learned in doing this animation was to be able to start from zero and walk step by step towards my goal.