
Click the Hole to view the video
© 2000 Gary Goemans and Craig Bannister
CONCEPT MODELING
THE CHARACTERS MODELING THE
HOLE SHADING THE HOLE
THE FLAG ATMOSPHERE
LIGHTING THE HOLE
THE SOUNDS THE
EXPERIENCE
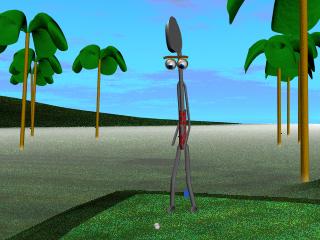
The concept for the golfman arises from the passion that both members have for the sport. The initial idea was just to have a regular man swinging the club. But this idea seemed close to impossible, until the end of production when we discovered that our own golfman character could simulate a true golf swing in close to perfect form. Sometime in early November, the idea of the characters hit Gary like a bolt of lightening. Now that the basis for our animated short where strewed across the tables, the ideas flowed at a constant rate. In fact, our ideas were so aplenty, that the animation could have run for several minutes. However time was of the essence. The final concept is comprised of those ideas that we felt were the best (and possible, given our capabilities). From the beginning we both envisioned the opening scene the way that it turned out. Just like watching a PGA tournament on television, the camera gives a bird's eye view of the hole, revealing the sand bunkers, the pin placement and so forth. The opening scene also introduces us briefly to the golfman character. The first camera cut ends with a description of the hole, as a real golfer would upon reaching the tee. The outcome of the second scene was never fully determined until we were sure of the capabilities of our characters. We made sure the camera centered around the most important aspects of the actions. The anger of the golfman was an important part of the complete video, so we were sure to focus in on his expression filled eyes and his hand gesturing. Like the first scene, the concept was to imitate the way in which golf is presented on television. The camera follows the ball, from its first contact with the club face, until it reaches and drops in the hole. This camera cut is indicative of golf on television. Finally, we thought it only fitting to place our names on a waving flag.THE CONCEPT
The first step in creating the golfman was to build his outer shell. The feet are simply stretched semi spheres, while the legs are cylinders, which were inserted with isoparms to allow the skin to deform with the joints. At the top of the legs, the cylinders were bent inwards to fit to the pelvis by selecting the upper isoparms, changing the point of pivot to just under these selected points, and rotating the inwards. The shaft (chest and abdominal region), the grip (pelvic region) and the arms, used the same principle as building the legs. The grip was shaded using a cloth material and the body parts used the default lambert shading. The head of the golf club was made by creating a semi sphere, and manipulating some CVs. A plane was then created and intersected with the other part of the club head. The head was shaded with a grey blinn. The intersection tool allowed for a snug fit. However, when this model was scaled down to fit inside the entire scene, the imperfections of the two intersecting objects was evident. The eyeballs are simply a sphere using phong shading and a U Ramp and no interpolation. To orient the eyeballs, the manipulator tool was used. The eyelids were created using a sphere and the the end and start sweeps were changed to expose the iris and pupil. The eyebrows are cylinders with the CVs rotated using the same method that was used to bend the legs into the body. A lattice was created around the eyelids and eyeballs, which was used to create expressions of anger and fear. For the expressions, a cluster group was created between the eyes which allowed manipulating the eyes into an angry pose and a fearful pose. Attributes of these expression were then created that allowed for different levels of fear and anger, and made keyable. The same attributes were made for the eyebrows. When in anger, the eyebrows rotated inwards, and when in fear, the eyebrows rotated outwards and translated upwards. A few other attributes were made for the eyes, such as blinking, and something called acknowledgement, which allowed the eyebrows to raise and lower, but never used in the animation.MODELING THE CHARACTERS
The character of the golfman was then given life using the Maya joint tool. The legs were given IK Handles, one from the heel to the hip and one from the heel to the ball, to control the movement of the knees and the ball and toe, respectively. The arms used the same kind of IK Handle from the wrist to the shoulder to emulate the motion. Using the expression editor, the rotation of the heel around the ball, and constraining of the ball and toe to the ground was scripted. For the bending of the spine, the IK Spline tool was used to connect the pelvis joint to the top of the spine. This created a curve in which the spine was attached. The curve point of this curve was pushed to the top of the spine, and deformed, placing a locator at the top of the spine which could manipulate the arc of the spine.
The final step was to bind the skin to the joints. First the legs were bound to the pelvis to the toes. Then the shaft, grip, and head were bound to the shaft. The arms were bound to a joint in the spine down to the wrist joint, and the eyeballs were parented to the another joint within the spine structure. This process was the final step, but it took many tries for the joints and skin to work together in the proper fashion.
The ball character turned out to be a simpler model then was originally
planned. Actually, another model was made that had a deforming mouth to
emulate expression, but was abandoned due to running time and rendering
size constraints. Also, a dimple texture/bump map that evenly placed
each dimple around the ball was quickly abandoned because the manner to
go about this task was unknown until late in the project.
The final product was a simply a sphere with the same eyes used for the
golfman.
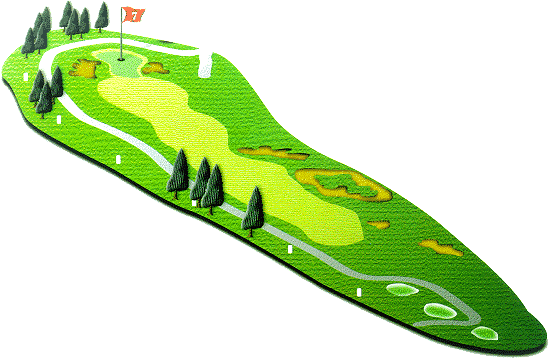
This was a very challenging task at first, thought it was going to be very easy, and was wrong! NURBS modelling would be best because of the more realistic look and feel of a rolling landscape, however there were difficulties lofting larger surfaces together like that, they needed to be aligned correctly. With days and days of struggling for the right look we finally came up with a sort of prototype, one that would have looked alright but not what was originally planned. Without the aid of texts (i.e.. books) the help file guided us on how to use all of the tools properly, and after several following days a method was discovered for creating the originally proposed idea. A large plane was cut with a series of steps, so that the bunkers, tee off, green and fairway fit perfectly into the rough but were separate entities. This made way for the shading of the scene, so that the bunkers could be given a sand texture separate from the grass of the fairways and rough.
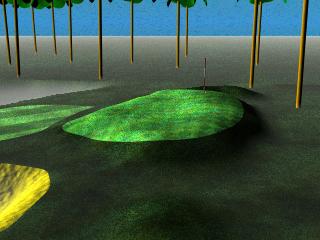
Even before cutting away the original planes the hole had to be set up to its proper landscape (i.e.. hills and valleys). Doing this was very easy. Maya's artisan tools allows the surfaces to be sculpted using a very good interface that let's you see it change in real time. After the scene was set up the out of bounds areas were stitched to the edges of the hole to create a continuous landscape that was for the most part free of errors or seams. The hole was fairly easy to incorporate, the flagstick, cup and flag were modelled first and then imported. To make the hole in the green it was trimmed from the surface of the green. Trees, rakes, tee blocks and the sign were all added later to add to the realism of the hole.
The shading groups to create all of the grass was taken from the Alias Wavefront website. The original was close to what was desired but was tweaked to create the best look for each type of grass. The group works as a series of fractals that is input as colour gains, offsets, and alpha's to another colour ramp. By changing the colour's of these fractals and ramp the desired texture of the grass was created. In order to add the lines to both the fairway and green another node that had a diagonal black and white line (for the fairway; the green was a diagonal checker board pattern) look was input into the final colour ramp for it's ambience to give the final look of the grass. Fractals were also used to generate the bump maps used in the bunkers, tree leaves, bark and sign for a more realistic look. The sign for the hole and the flag for the hole were both drawn using a paint program and imported into Maya.
The flag was fairly hard to do, but with enough tutorials on the web to help out this wasn't too much of a problem. This involved setting up a NURBS plane and converting it to a softbody. The most interesting aspect is that it is totally controlled by the dynamics behind the system. An air field was set up right behind the flag, this works like a giant air fan to which you can control it's direction, speed, and shape. A turbulence field was added to generate the whipping motion of the flag as it responds to the air. This can control just how stiff the flag is. The final touch adds gravity to the flag, and with the proper goal weights painted on to the shape of the flag the resulting animation of a flag blowing in the wind results. Without the help of any of the online tutorials this would be extremely difficult to understand.
A ground level fog was added to the scene at just the right height so
that the fog can be seen thick and heavy in the valleys and how the hills
seem to jut out of the fog. This is a great effect that is extremely
easy to create. One of the hardest atmospheric effects was the sky.
A environment sky was added any camera that was used for rendering and
a three dimensional cloud texture was mapped to the interior of the sphere.
The hardest problem was figuring out how to make the clouds show up right
or even at all! The end product of this process was worth all of
the work.

1. 2. 3.
A directional light was initially used to create the scene however more
lights like point lights were used to light the sign and golfer.
Too little lighting made the scene too dull and too much made it way too
bright, there was a total of 3 lights used to create the scene.
Finding the sounds for the hole turned out to be quite simple.
Caddyshack is, in our opinions, one of the funniest movies about golf.
And Bill Murray's monologue is one of the high points of the movie.
The sound of the swing, and the ball being hit, were both found within
the monologue. In fact, both of these actions were best represented
by the Caddyshack file, as opposed to other golf sounds that were found
on the Web. The bird sounds were found just as easily as the Caddyshack
sounds by using a multimedia search. There is a number of different
birds such as the sparrow, oriole, cardinal, and an unknown chirper.
To add extra realism, a passing plane was also added.
Our experience with Maya was very interesting. At times our efforts to piece this project together seemed hopeless. Other times we made mind boggling discovers, and became impressed with our own creations. For a month our lives became Maya. Maybe it was the insanity of staying in the labs until 3 am. But it was the anticipation of seeing the final product that kept us going (plus 10% of our mark). It was also amazing to see the genuine interest between groups to help each other, and witness each other's creativity. Not to mention the laughs that were often heard. The experience with Maya could have been a course on its own because it did take time and effort to become accustomed to it. However, we both leave this computer animation project with positive thoughts.

Last updated: 01 19 2000
Questions or Comments cb97al@sandcastle.cosc.brocku.ca
or gg97ac@sandcastle.cosc.brocku.ca
Brock University Department
of Computer Science.
Disclamer.