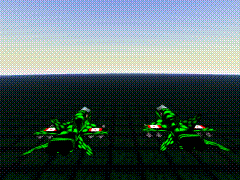
 Initial Scene
QuickTime Movie File:
2Planes 4.7Mb
Initial Scene
QuickTime Movie File:
2Planes 4.7Mb
URL: http://www.cosc.brocku.ca/~md95ao/page2.html
My name: Mike Douma Project: Animation Project Title: 2 Planes Format: QuickTime.
Two Canadian F-18 Hornet fighters are flying their next mission.
They come to a small mountain range and increase altitude to clear over it.
As they come across the range, an unknown tank is moving towards them.
As it raises its gun, the planes realize they are in trouble.
The tank fires a shot and hits one of the planes.  The plane falls toward
the ground, but not before the pilot has a chance to eject.
The second plane, however, comes in and fires a missle at the tank, blowing
it to pieces.
After many weeks of thoughts and ideas, I finally came to the decision that I
would produce an animation that contained (at least) a plane in it.  I am a
fan of combat flight simulation games such as JetFigher III (being my favorite)
and therefore I thought it reasonable to undertake this task.  Of course, the
plane needed something to blow up, and for this reason I included a tank in the
animation as well.
With little time to spare, I began to model the plane about a month before the
project was due.  This took me about three nights and altogether about 10-15 hours.
With two weeks left before the project deadline I made some refinements to my
original plane by adding missiles to it, adding the textures, and adding
the Canadian Flag decals.

I created a tank in about 2-3 hours, and had it fully decorated with textures
within about 5 hours.  The next part was developing the scene.

The entire scene was created and stored in a single file.  The mountain range was
created first, and then all the required motion paths.  Initial tests of the motion
paths were done using simple spheres as objects.  Installing the 5 camera views was
a little tricky, but accomplished.  Once this was done, I imported two planes and
a tank into the scene, and gave them their respective motion paths.

Some refinements to the timing of the objects and the cameras was done, and then the
project was rendered and stored into a QuickTime movie format.
All models used in my animation were created using Alias PowerAnimator 8.5.
They were all designed and drawn myself using two books that I
have, as a reference towards getting a more accurate model.
     *Ref 1. The handbook for Jetfighter III.     (by Mission Studios)
     *Ref 2. The handbook for Armored Fist II.    (by Novalogic)

This was the most time consuming task by far, but when you see a good model
in the animation, it makes the time spent worthwhile.


The models used in the animation include:
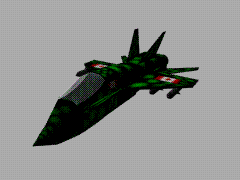
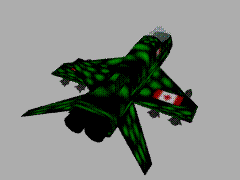
Plane (3 views)
Tank
Mountain Range
There are five cameras used in my animation.
All five of these cameras follow motion paths.


Camera 1:  Follows the two Canadian F-18 Planes until the come to the mountain.
           Runs from frames 1..99.

Camera 2:  On the opposite side of the mountain, camera 2 watches the planes
           as they come over the range and begin to descend.
           Runs from frames 100..167.

Camera 3:  We see the tank moving into position and raising its gun.
           (the gun would actually fire a shot)
           Runs from frames 169..227.

Camera 4:  We see one of the planes falling to the ground.  If you look
           closely, you can see the hatch of the plane opening, but the
           pilot doesn't eject. The camera cuts away before the plane crashes.
           Runs from frames 228..287.

Camera 5:  We see an incoming missle from the second plane blow up the tank,
           and then fly by the scene.
           Runs from frames 288..360.
Here you will find the textures that I created and used in my animation.
All of the textures were created using Alias/wavefront StudioPaint 3D 4.0.
The textures were saved as BITMAP files, and exported into Alias PowerAnimator
and assigned to the models.
The only thing I didn't create was the sky environment
which was a selectable item within Alias.
**There are actually two texture maps missing below.
- the texture used on the mountain range.
- the texture used on the body of the tank
I accidentally deleted them while moving files around.
Both of these textures were variations of the Camo, and Floor textures
shown below.
 Camo.GIF
This texture was used on the body of the planes.
Camo.GIF
This texture was used on the body of the planes.
 Flag2.GIF
This texture was used as decals on the two planes.
The texture was first placed on 2D planes, and then these planes were
put on both wings of the planes as well as on both sides of the planes
under the cockpit.
Flag2.GIF
This texture was used as decals on the two planes.
The texture was first placed on 2D planes, and then these planes were
put on both wings of the planes as well as on both sides of the planes
under the cockpit.
 FalseHill.GIF
This texture was used on the backside of the mountain.
Explanation: The mountainside is actually 3D and made with depth and curves.
When viewing the back of the hill it appeared as a solid black colour even
though it was given the same colour as the front of the mountain. This was
due to the fact that the backside was drawn straight down as opposed to the
front side which was given depth and various curves.
Therefore, I created a 2D plane, placed this texture on it, and placed it
directly in front of the backside of the mountain to make it seem like the
backside of the 3D mountain range. If you look very closely during camera 2's shot,
you can vaguely see that this texture only extends onto a plane, and not the entire
mountain surface. This texture does give a 3D effect which was what I wanted.
FalseHill.GIF
This texture was used on the backside of the mountain.
Explanation: The mountainside is actually 3D and made with depth and curves.
When viewing the back of the hill it appeared as a solid black colour even
though it was given the same colour as the front of the mountain. This was
due to the fact that the backside was drawn straight down as opposed to the
front side which was given depth and various curves.
Therefore, I created a 2D plane, placed this texture on it, and placed it
directly in front of the backside of the mountain to make it seem like the
backside of the 3D mountain range. If you look very closely during camera 2's shot,
you can vaguely see that this texture only extends onto a plane, and not the entire
mountain surface. This texture does give a 3D effect which was what I wanted.
 TankTread.GIF
This texture was used on the treads of the tank.
TankTread.GIF
This texture was used on the treads of the tank.
 Floor.GIF
This texture was used on the floor of the environment.
Floor.GIF
This texture was used on the floor of the environment.
     There are several lights used in the animation.  They were added mostly
so you could see the mountain colours, as well as the plane and tank colours.

Light 1:  Is set to a motion path and follows the planes in frames 1..99.
          It is an ambient light used to light up the planes.

Light 2:  Is a fixed light and is positioned towards the front of the mountain
          range. It too is an ambient light.

Light 3:  Is a directional light, placed above the mountain range pointing
          directly at the 2D plane drawn on the backside of this range.
          Without this light, the backside of the mountain range looked black.

Light 4:  Positioned above and towards the tank.  It is an ambient light.
          It allows us to see some of the tanks colours.
          I wanted the tank body to appear darker in colour, and for this reason
          I kept the lighting rather low for this shot.
     Although this project was a lot of work, it was very rewarding to see
a finished product at its completion. (even though it was only 15 seconds!)

The project has given me a deeper appreciation for animations that I see on
the TV, and I feel I have learned something VERY valuable to my future in computers
- regardless of whether or not I will go into a graphics field.
Most of all, this project was kind of fun (even though I'd hate to admit it!)


Mike Douma.

Back to 1999 animations.